A New Home!
But hopefully you won’t notice.
I decided it was time
For a number of reasons I have been maundering about moving my webhosting and I finally made the leap. The last time I moved was back in January 2014. So it was time, right? The first move was January 2010 from a home server to GoDaddy… that was barely 4 years. Complacency must have set in.
The reasons? Well, in no particular order:
Speed
My old host was dreadfully slow sometimes and I could never figure out if it was my site design and years and years of clapping odds and sods together and shoddily attaching them to the site or just them. Moving gives me a chance to experiment with a new provider and to clean up a bunch of crud that has accumulated.
Money
2 more years of hosting on the old site was going to be $216 usd ($276 cad). Taking advantage of a “new customer” deal netted me 3 years for only $148 cad.
Canadian laws
I have become increasing disturbed by the slowly eroding privacy laws in the U.S. L had needed a Canadian-based server for her research project last fall and I did a bunch of research on Can-based hosts. Since I was moving, why not move to a Canadian company and avoid any increasingly privacy-creep that seems to be the American judicial system. And I know, it really is more symbolic that actual, but still. Oh, and it’s “buy Canada” too! So I get loyalty points.
Python
One of the things I noted when I was doing my research was that some hosting companies allowed python and ruby apps. It was a point of great frustration a few years ago that I had to host my apps on my home server. This new host allows such apps to be hosted. I probably won’t move my old ones now but any new apps can be hosted off my home site.
Downsides?
Time and effort
It took half a day of planning most of a day work to move everything and I am still not sure its been 100% successful. But I like puttering and I learned some shit so why not.
rsync
So far the only big downside is rsync doesn’t seem o work on the new host. I will have to ask when I get to that point. Rsync was what I used to deploy my hugo website automatically: syncing my desktop files to the server. I can use ftp in the mean time but just typing deploy was a great way to update things.
What do I spend this money for?

My new host! Oddly enough L’s research project is hosted here and they suffered a nigh-on-catastrophic breach this past summer. Luckily, at least for us, everything was restored pretty thoroughly. So why did I pick them? Well I figured that the security breach probably taught them a huge lesson and, at least for a while, they are going to have some pretty hot and up-to-date security in place. And all the reasons above.
And I learned a lesson about my own back-ups as well. 🙂
webhosting
I host a number of sites.
– macblaze.ca—my personal home since 2005
– neverforever.ca—our boating site
– astart.ca—my professional site
– theboozephiles.com— my, L’s, C’s and Z’s cocktail site. Check it out if you like booze!
– beakerwood.ca—my brother’s woodworking site. permanently under construction these days
And two more for C which are little more than placeholders but I keep hoping she will let me make her some spiffy sites.
– reluctantlyyours.ca
– littlefirecreative.ca
subdomains
I also use a bunch of subdomains to direct web traffic to various projects and my home server. This is an offshoot of my handy Pi Nginx project!
At least 4 site-specific email addresses. I have no idea why people shell out for mybusiness.com and then use mybusiness@gmail… seems a waste of resources. Most of them just forward to my existing addresses but at least one is standalone.
various projects
I have hosted api’s, static sites, otehr people’s domains etc. It gives me a lot of flexibility—and as I mentioned above I can now host python web apps.
A bit more complicated but…
So how was the move compared to last time? A bit more efficient, but also a bit more complex wth all the various sites. 3 of them were WordPress sites with associated mysql databases and structures and the other 4 were just static. So I did a massive host-wide backup and downloaded the 9-gig zip file to my desktop. I also exported the 3 mysql databases using the backup tool.
After that I, one-by-one, starting with the smallest and easiest (beakerwood.ca), worked on a site:
- Create a subdomain
- Upload the files
- Changed the nameservers (on GoDaddy)
- Made a small edit to the index.html/php file for checking purposes
- And waited about 10–20 minuted for the domain name to propagate through the internet
And voila!

The WordPress sites started with creating a new, empty mysql database and the using phpMyAdmin to import the files downloaded from the old server. Then it was simply a matter of zipping the dowloaded wp installation, uploading it and then extracting the files. Like last time back in 2014 I tried uploading the un zipped files first and it was excruciatingly slow. But I clued in quicker this time. You would have thought I would go back and read those notes (since that is primarily what this site is for) but no… dumb, dumb, dumb 😉
The only thing I had to do was change the wp-config.php file to use the new database name and credentials. It all worked smoothly except for macblaze.ca but eventually I got my silly errors straightened out.
add emails
Since they were mostly forwards this was simply a matter of adding new emails tot eh new host. Everything else (smtp servers etc) stayed the same.
ssh
I had a bit of trouble getting ssh to work but it was because they use a different port. A quick chat with tech support straightened me out. Now I just have to figure out the rsync thing.
C’est tout
That’s pretty much it. So far, so good. I cancelled my account at Stablehost and already got back a “please don’t go, here is 6 months free…” note, but I am committed now. We shall see…
An introduction to dashboards
As I have been playing with my Pi I have been introduced to a bunch of new concepts and terminologies. The first is Homelab. Apparently it is a thing to build a your won server and set it up wth some high powered stuff. If you watch the YouTube videos you get the sense that these tare might powerful systems but reading between the lines you realize that’s just because they are YouTubers and need to keep ahead of the curve. My Pi and Shaw’s router qualify just fine as a homelab. It seems all I have to be doing is installing shit, breaking shit and adding even more shit. Check.
The next one, and more relevant to this post is dashboard. After you get your home server all set up you start to realize that most fo the services are web-based and it get to be a lot of book marks for things you go back to again and again. So the idea of a custom start page was born (reddit even has one of those reddit forums thingees dedicated to it: https://www.reddit.com/r/startpages/). Taking the idea further a bunch of developers have made apps to manage the underlying code as the whole idea of a homelab is that it changes pretty often and hand-coding a new webpage every time would get monotonous.
Homer
![]() Homer was the first dashboard I encountered and frankly, IMHO, still the best. I will look at some of the others later. Homer is a project developed by Bastien Wirtz and is available as a docker container.
Homer was the first dashboard I encountered and frankly, IMHO, still the best. I will look at some of the others later. Homer is a project developed by Bastien Wirtz and is available as a docker container.
Out of the box it is pretty basic and frankly ugly:

But it does come with a bunch of easy configuration options to make improvements pretty quick. And if you dig deeper you can tweak it pretty significantly. I came across walkxcode’s modded theme and immediately started stealing some of his settings to get it the way I wanted.
The config is all based on yaml (yet another markup language) which I learned for my Hugo web pages so I was already pretty familiar with the format. Adding or deleting items on the page is simply a matter of editing the config file.
items:
- name: "Awesome app"
logo: "assets/tools/sample.png"
subtitle: "Bookmark example"
tag: "app"
url: "https://www.reddit.com/r/selfhosted/"
target: "_blank" # optional html a tag target attribute
It features colour-coded tagging, as many categories as you want 2, 4, 6 or 12 column layout, a link/menu bar, optional header and footer, additional pages and a list view. You can add in a custom background, use light or dark mode and a few cool applications like hooking up to a Open Weather api to display your local weather.
Homer does have a few major downsides. Although there is a search function it only searches the startpage. Many of the other dashboards integrate google or duck duck go searches into the search field so you can use it as your browsers’ default page. And it uses vue.js (which is Greek to me) and scss (which is more Spanish—I understand some of it, but wouldn’t dare try and speak it) so making changes is not as straightforward as I might like. Hence the borrowing of walkxcode’s work.
But all in all after I got it where I wanted to be. For now 🙂

Page2

The Competition
If you look in the fourth column you will see Flame, Heimdall and Dashboard, which are all other dashboards you could use and I tried them all to one degree or another.
Dashboard
Dashboard (https://github.com/phntxx/dashboard) is the simplest (and I think the oldest). It works from json files which I have played with but is harder to parse than yaml and much more visually complex which makes it harder (for me) to make quick edits without screwing up the format. Other than that I didn’t like the lack of custom icons and the strict layout format.

Flame
As far as I can tell Flame (https://github.com/pawelmalak/flame) is mostly a fork of Dashboard…at least visually. It added in a web interface so you could add icons and links using a browser rather than having to edit a config file. Which put it ahead of both Dashboard and Homer, but, in the end I didn’t like the restrictions imposed on the way info was displayed and was frustrated with what kind of info you had to show.

Heimdall
The last dashboard I tried was Heimdall (https://heimdall.site/) which seems to be pretty popular and much more professional. My big issue with it (and indeed with Homer but there I could fix it) was the size of the app “buttons.” I still run a 1920 x 1080 screen and you just can’t fit many buttons onto one screen. Add in a search bar (disabled in the screen shot) and it just looked bloated. But it did have the web interface, lots of custom tags and categories and would probably look way better on a higher resolution screen.

Calibre Web Scraping Update
Stupid security
One of the recent updates to Calibre Web (I am on v0.6.14 now) introduced some security to the login in the form of a csfr token. I had no idea why my script wouldn’t work anymore until I started taking it all apart.
What I ended up having to do was use Beautiful Soup to load the html content of the login page, find the csfr_token and then add it to the login data. I also added in the cookies, although frankly by that time I wasn’t sure if it was necessary or not. But it works so I left it.
Just a note, if any of you have found this page wanting to scrape Calibre-Web, if you search the site for the tag calibre you find the whole journey
The current python script
#! /usr/local/bin/python3
# coding: utf-8

# python script to import shelfs of books from Calibre-Web
# and save them as a markdown file

# import various libraries
import requests
from bs4 import BeautifulSoup
import re
import os
# enable sys.exit()
import sys

# set header to avoid being labeled a bot
headers = {
    'user-agent': 'Mozilla/5.0 (X11; Linux x86_64) AppleWebKit/537.36 (KHTML, like Gecko) Chrome/67.0.3396.99 Safari/537.36'
}

# set base url
urlpath = 'https://MY_CALIBREWEB_URL'

# calibre-web login data
login_data = {
    'next': '/',
    'username': 'MY_USERNAME',
    'password': 'MY_PASSWORD',
    'remember_me': 'on',
}

# login as a session
with requests.Session() as sess:
    res = sess.get(urlpath + '/login', headers=headers)
    login = BeautifulSoup(res._content, 'html.parser')

    # find security token and extract value
    csrf_token = login.find('input', {'name': 'csrf_token'})
    csrf_token = (csrf_token.attrs['value'])
    # print(csrf_token)

    # append securtiy token to login dictionary
    login_data['csrf_token'] = csrf_token

    # login with token
    res = sess.post(urlpath + '/login', data=login_data, cookies=res.cookies)
    # print(res.text)


# set path to export as markdown file
path_folder = "FOLDER_PATH_MOUNTED_BY_SHELL_SCRIPT"

# check ifserver is already mounted and change path if so
if os.path.isdir(path_folder):
    print('valid drive')
elif os.path.isdir("/Volumes/www/home/books/"):
    path_folder = "/Volumes/www/home/books/"
else:
    path_folder = "/Volumes/www-1/home/books/"

# open the file
file = open(path_folder+"bookfile.md", "w")

# Set Title
file.write("# Books Read since 2012\n")
# print("# Books Read\n")

# Set intro blurb
file.write("This is an automatically generated list of books scraped from my Calibre ebook library (  Making A “Books Read” Page  ). As a result it does not include any  paper books I may have read as they do not exist in that library.\n\nI update it regularly and finally went back and added all the previous years. Links to previous years’ book count posts: \n-  2012  (85)\n-  2013  (95)\n-  2014  (106)\n-  2015  (92)\n-  2016  (101)\n-  2017  (120)\n-  2018  (142)\n-  2019  (123)\n-  2020  (112)\n")


# find list of shelves
shelfhtml = sess.get(urlpath)
soup = BeautifulSoup(shelfhtml.text, "html.parser")
shelflist = soup.find_all('a', href=re.compile('/shelf/[1-9]'))
print(shelflist)

# reverse order of urllist
dateshelflist = (shelflist)
dateshelflist.reverse()
print(dateshelflist)

# loop through sorted shelves
for shelf in dateshelflist:
    # set shelf page url
    res = sess.get(urlpath+shelf.get('href'))
    soup = BeautifulSoup(res.text, "html.parser")

    # find year from shelflist and format
    shelfyear = soup.find('h2')
    year = re.search("([0-9]{4})", shelfyear.text)
    year.group()
    file.write("\n### {}\n".format(year.group()))
    # print("### {}\n".format(year.group()))

    # find all books
    books = soup.find_all('div', class_='col-sm-3 col-lg-2 col-xs-6 book')

    # loop though books. Each book is a new BeautifulSoup object.
    for book in books:
        title = book.find('p', class_='title')
        # print(title)
        author = book.find('a', class_='author-name')
        #print (author)
        seriesnamea = book.find('p', id='series') # I have to manually add this id to the shelf.html template
        seriesname = (seriesnamea.text if seriesnamea else "").replace(
            "  ", "").replace("(", " Book ").replace(")", "").replace("\n", "")
        if (seriesname != ""):
            seriesname = "*" + seriesname + "*"
        #print (seriesname)
# NOTE: pubdate is custom added by me to /templates/shelf and won't work in a standard install
        pubdate = book.find('p', class_='series', id='pubdate')
        if pubdate:
            #print (pubdate)
            # extract year from pubdate
            pubyear = re.search("([0-9]{4})", pubdate.text)
            pubyear.group()
            pubyear = pubyear.group()
        else:
            pubyear = "n/a"
        # construct line using markdown
        newstring = "* ***{}***  — {} ({})\n{} – ebook\n".format(
            title.text, author.text, pubyear.group(), seriesname)
        #print (newstring)
        file.write(newstring)

file.close()
NOTE—July 18, 2023 Added some new code from various updates (see calibre updates)
Instagram Since Last Time


Education anyone?
Someone with absolutely no understanding of what an education is for…lol.
Stuart Smith 28 minutes ago
Training and apprenticeships are important elements in our future. Good on AB’s government for spreading some of the lolly around to small business rather than simply massively subsidizing universities who produce workers absent marketable skills. But universities do produce lots of inside hands reaching out for a lifetime defined benefit fully indexed pension.
— Comment section
https://www.cbc.ca/news/canada/calgary/jason-kenney-jobs-announcement-alberta-second-stage-1.6242690
Pi update
…Because I know you care 🙂
 When last we left our intrepid Pi I had listed the software I had running on it. Here’s a quick recap of what that install was with a few of the missed out bits:
Pi 4 Model B with 8 gb of ram
5oo gb external
-
- Ubuntu 21.04
- Shairpoint-sync music server
- Nginx Proxy Manager
- Webhost Apache/php
- MySql server
- Pi-Hole
- Nextcloud server
- Samba File Server
But after watching a few videos (Novaspirit tech’s Pi series) and playing around with Docker a bunch more I basically redid the whole thing from scratch. So that makes the above info completely redundant 😉
SD backups
A word about installs and backups. One of the things I am especially happy about with the move to a Pi is the ability to image SD cards. It took me a while to get my methodology straightened out but here it is
Step 1: Install base operating system
I currently have two base installs:
- Ubuntu 21.04 — this is a GUI-less (command line only) install of the Ubuntu linux distro. It has become my main system.
- Ubuntu 20.04 Mate — this is the Ubuntu install with the MATE desktop and apps suite. I have pretty much abandoned this.
Set up server (this is for the headless Ubuntu):
- change host name
- add user
- set static IP
- install and set up Samba
- install and set up Docker & Docker Compose
Step 2: Create an image
After I had everything installed and set up, it’s time to make an image of the SD card. Shutdown the computer and and pop the SD card into the MacBook SD slot.
Open Terminal and use dd to make an image:
sudo dd bs=1m if=/dev/rdisk2 of=/Users/admin/Desktop/pi-server.img
To parse this, it is basically saying: using root permission (sudo), make an image (dd) using 1 megabyte blocks (bs=1m) of the disk labeled disk2 to a file on the desktop named pi-server.img
This can take a long time depending on the size of the disks. With a lot of trial and error I settled on using my 32 gb SD card to make these images from and it takes around 400 seconds (6.7 minutes). When I tried with both the 64 gb card or even worse the 500 gb hard drive the time sometimes was in the hours. Which was ridiculous because most of that copy time was copying blank space.
What this means is I have to make all my changes to the install on the 32 GB card, which may mean redoing them since I generally make them first on the hard drive install. But it works for me as it forces me to a) document the changes I am making and b) do them several times which helps me ingrain them in my memory.
This leaves me with 32gb disk image on my laptop that I then re-image back to the 500GB hard drive — which is a pretty quick process.
I repeat this process whenever I make a major change to my setup so I can revert back anytime I screw something up (which thankfully is happening less and less).
The new install
This time I started with the base install described above (Ubuntu, Samba for file sharing and Docker to host containers), made an image and then moved on.
Docker
As I said in my Drop Dropbox? post, Docker is is a sort of virtual containerizing system. Rather than a true virtual machine (which acts as a completely different physical machine complete with OS and hardware configs), a container is an isolated “box” into which you install your applications and whatever settings they need. The Docker host manages the network interfaces and whatever other i/o you need. The beauty of this is you can install all sorts of support programs or drivers without affecting — or in my case, screwing up — the rest of the system. If you don’t like it or make a mistake, you just shutdown the container and delete it and poof, it and all its resources are gone.
Portainer
 One of the things that made me switch to an almost completely Docker-based setup was the discovery of Portainer, which is a web-based GUI that allows you to manage all your Docker containers without having to understand the often complex and arcane Terminal commands used to invoke and manage them.
Oddly enough Portainer itself is a Docker container so that mean you have to do thing the hard way at least once. Create a docker volume (docker volume create portainer_data to store the app data on) and then run:
docker run -d -p 8000:8000 -p 9000:9000 --name=portainer --restart=always -v /var/run/docker.sock:/var/run/docker.sock -v portainer_data:/data portainer/portainer-ce
And you are done. Sign into the system by typing http://<insert IP address>:9000 and you should be good to go. Here’s a screen shot of all my containers at the moment:

NGINX Proxy Manager
Next up was a reinstall of NGINX Proxy Manager to manage SSL and routing. You can read about it in the NGINX Proxy Manager post.
One difference in this install was I used Portainer to install it as a Stack (a group of associated programs). This meant the NGNIX program and its associated Maria database were installed in separate containers that were linked together so they could be managed as a unit.
Then I reinstalled the Portainer container so it was using the same virtual network as NGINX and they now all talked to each other securely and happily.
Homer
An app called Home was recommended by several sources so I decided to give it a go. Home is a lightweight dashboard that allows one to have a convenient starting place for what is rapidly becoming my HomeLab. It runs off a simple yaml (stands for yet another markup language) text file.
You just add an entry like
- name: "Boat Search"
logo: "assets/tools/swan.png"
subtitle: "Utility to search Yachtworld"
tag: "pythonapp"
url: "192.168.1.3:8889"
target: "_blank"
And it adds another item to your dashboard.

Then I added a Samba entry to allow me to change the config.yml file and drop in additional icons
**MAKE ANOTHER IMAGE**
LAMP
With that done I installed my lamp stack again (Linux, Apache, Mysql, and php) to redo my test websites. I decided not to do this in a container as I figured it wasn’t going to change.
**MAKE ANOTHER IMAGE**
Shairport
Currently I am having issues with the dockerized version of this. The sound cuts out every once in a while and I can’t figure out why. I may go back to the direct install from What’s your Pi doing? and see if that solves the issue. But for now I have it as a Docker container—but disabled.
NextCloud
 (See Drop Dropbox?) Again this is now purely Docker based and the install was super easy using Stacks. I can turn it off and on as I like and see how much of my Pi’s resources it is using.
YouTube DL
 This one is new. I had this app installed on my Mac mini as it allowed me to download favourite YouTube videos for offline watching. But now I can use it with a web interface. I haven’t played with it much, but I expect it will be much more convenient than the command line version. (Note: I have subsequently had problems with this leading me to discover that YouTube is throttling the app. The first few videos go fine then it drops down to a snail’s pace rendering it almost unusable.)
**MAKE ANOTHER IMAGE**
Python Apps
I built a python/flask app to calculate Bus Fares for L and decided to see if I could dockerize it. It worked out pretty good and so I added it to the mix so L could use it. Again the ability to manage it and turn it off and on will be a bit of a godsend as I develop it further.

The apps needed python and a webserver (I tried to use nginx but ended up going back to gunicorn — I was having trouble with uwisg in the container). It took some fussing as the resulting containers were initially 800 mb but eventually I knocked them down to a sixteenth of that size.
I also decided since that worked so well I would take my boat search app (If you can’t boat, dream…) that was hosted on the Google Cloud and move it to the Pi. And in the end I was able to share the python container between the two apps.
**MAKE ANOTHER IMAGE**
Grafana & Prometheus
Last but not least I wanted to be able to track some data about usage and load since I was now adding quite a bit onto the poor ~$100 Pi. A bit of research, one last Stack, and I was good to go.
Prometheus is an application that collects data from your machine. It can organize and store a ton of stuff and is so complex I ended up just stealing others’ setups. It uses plugins (I installed cadvisor and node_exporter) to collect specific data. The two I have monitor the docker containers and things like the cpu/temperature/network stats from the Pi.
Grafana is a web interface the graphically displays a dashboard with whatever data you managed to collect with Prometheus. Also complex and the config is again “borrowed.”

Très cool.
**MAKE ANOTHER IMAGE**
So that’s it for now
Everything is humming along splendidly now. I still have the issue of Shairport to deal with but that is minor. I can go back to any of the multiple images I have and start over from there or simply delete a container and not have to worry about residual crud interfering with future installs.
I have tested docker containers for things like my Calibre library which I might potentially move off my Mac mini and am looking into OpenVPN and an online FileBrowser. But that’s all for the future.
I am a happy camper. But I wonder if I should get another Pi… hmmm…
Calibre: Lost and Found
After the most recent update to Calibre Web I had an issue logging in. In true me-fashion I screwed around for a bit and then tried reinstalling. It worked. However that overwrote the database that held all my settings and poof! — all my shelves were gone. That was a listing of all my books read from 2015 to now. Grrr.
(As a side note, just as I was mildly panicking about this, L plaintively called my name and informed me she had lost her much beloved sapphire in the garden bed. So off I went to hack and slash the flowerbed to look for it. Luckily a) it’s fall and it needed hacking and slashing and b) it only took about 15 minutes to find it. So all’s well on that score.)
Anyway back at my desk, I was a bit annoyed and went digging around in the file repo (always doing things the hard way…) to try and find where the shelves and their contents might be stored and if they were recoverable. Eventually I realized two small, but significant facts: 1) I had for some odd reason copied the calibre-web folder before reinstalling—I almost never make backups… I must be learning finally! and 2) there is a handy FAQ… duh.
https://github.com/janeczku/calibre-web/wiki/FAQ
What do I do if I lose my “Admin” password?
If there are more than on admin on your instance any other admin can generate a new password for your account. If the only admin forgot his password: You are in trouble. Currently no password reset function is implemented. The only option would be editing the password in the app.db with a sqlite Database editor, or starting from the beginning.How to Backup Calibre-Web Settings?
All settings of Calibre-Web are stored in the app.db in the root folder of the project.If you are using Google Drive as ebook storage than you also need to backup the gdrive.db, settings.yaml and gdrive_credentials files.
So obviously the info was in the app.db file! I then spent about 15 minutes trying to download a SQLite editor (DB Browser for SQLite https://sqlitebrowser.org/dl/) via brew (brew install --cask db-browser-for-sqlite) which helpfully installed an app in the Applications folder. Then I dug around for another 5 minutes trying to figure out the SQL statement to import the data from the backup database into the active database until the lightbulb went off (of the low wattage LED variety if that matters) it occurred to me that was completely unnecessary.
Just copy the backup app.db over the current app.db you idiot…but make a backup first!
So I did.
And it worked.
All’s well that ends well.

Instagram Since Last Time


Open Source
L needs a textbook for a course. Her go-to is now out-of-print. Last year she used an open-source textbook from UBC in a different course and was keen on the idea.
So she wrote one.
And I get to make it a book.
 Making an epub/pdf text

So it’s been a scramble because she was still writing while I was trying to adapt the tools (standard ebooks toolset) I usually use to fit the new model. Eventually she wants to host it with the MacEwan OER repository and that might mean moving it over to Pressbooks which they use for publication and version management, but for now I was just going to stick with what I knew best. And frankly Pressbooks has turned into one of those things like Microsoft Word that tries to do too much in a way that appeals to the lowest common denominator and ends up being more confusing than helpful.
So I stuck with my own tools for now. My intent is to produce a epub/azw files and then covert back into pdf. It sacrifices a bit on the design side but it ensures clean epub files and, after all, its only a text book—and a free one for that.
Process
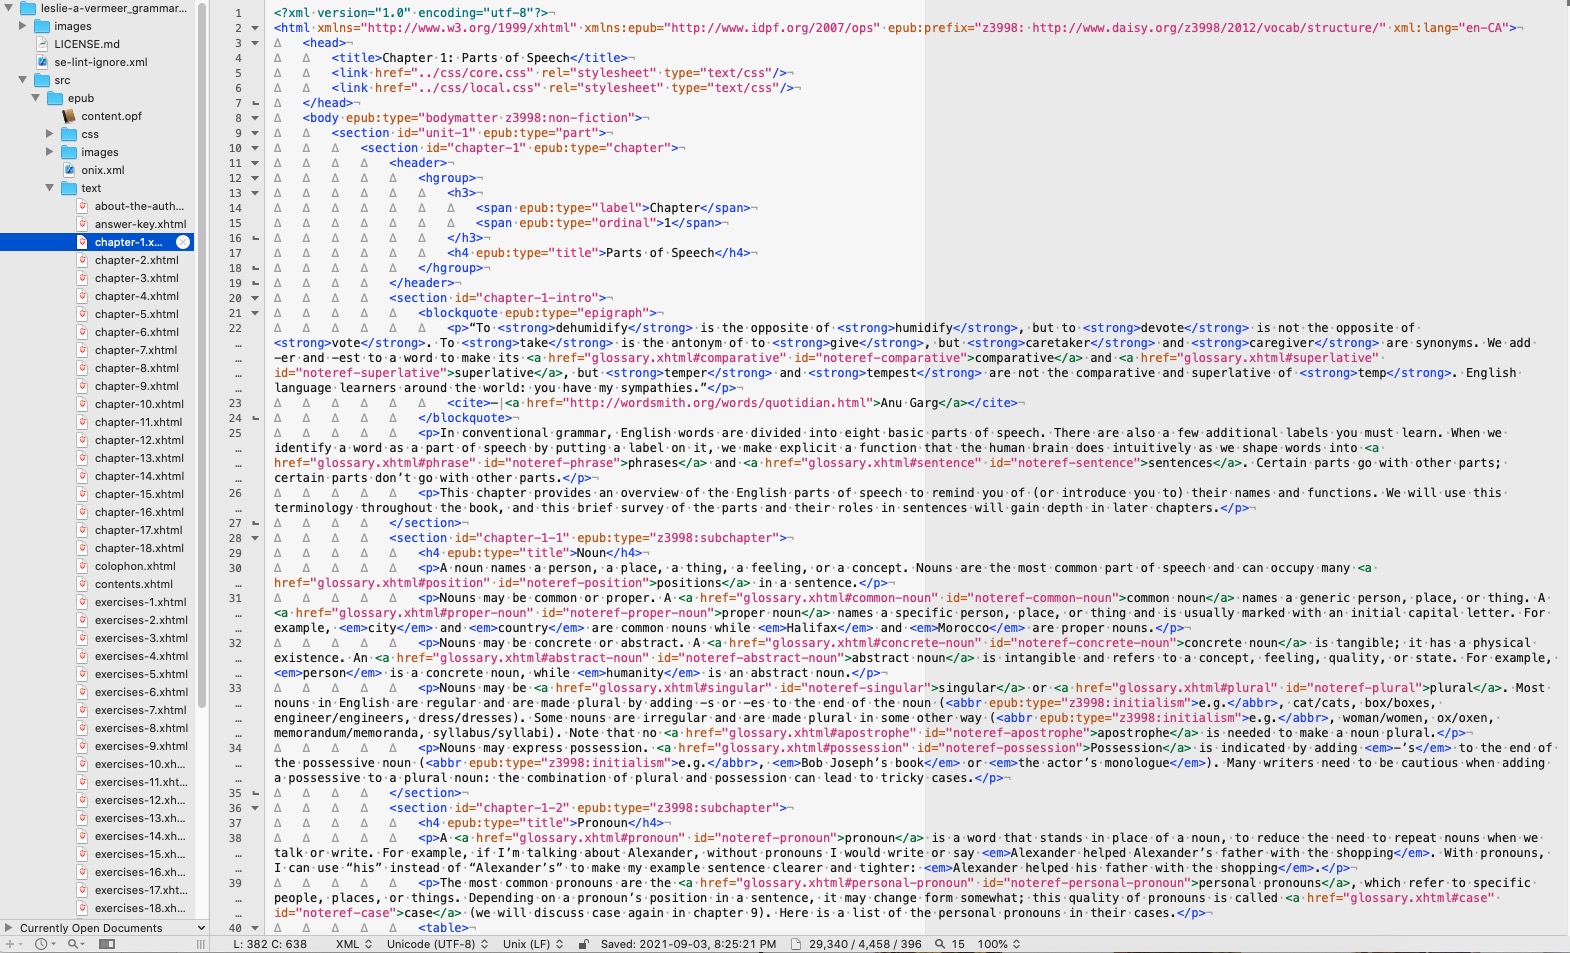
Step one was revising the Standard file templates so I could continue to use the tools without anything hiccuping (thanks Alex for all the latest revision that have facilitated that!) and building out the extra components.
This meant adding a glossary (and associated linking system), a table of contents (because Standard eschews them for the built-in version), answer keys (again with associated links back to the exercises), a bibliography and an About the Author page. Pretty much everything else came straight from the basic templates I usually use.
I also had to go through and change and adapt things like logos, metadata that referred to Standard Ebooks and their imprint and colophon. I also had to remove all the references to the custom Standard Ebooks semantics, redesign the cover build tool and research and ask some question in regards to the more complex hierarchy (again, thanks Alex!).
Challenges
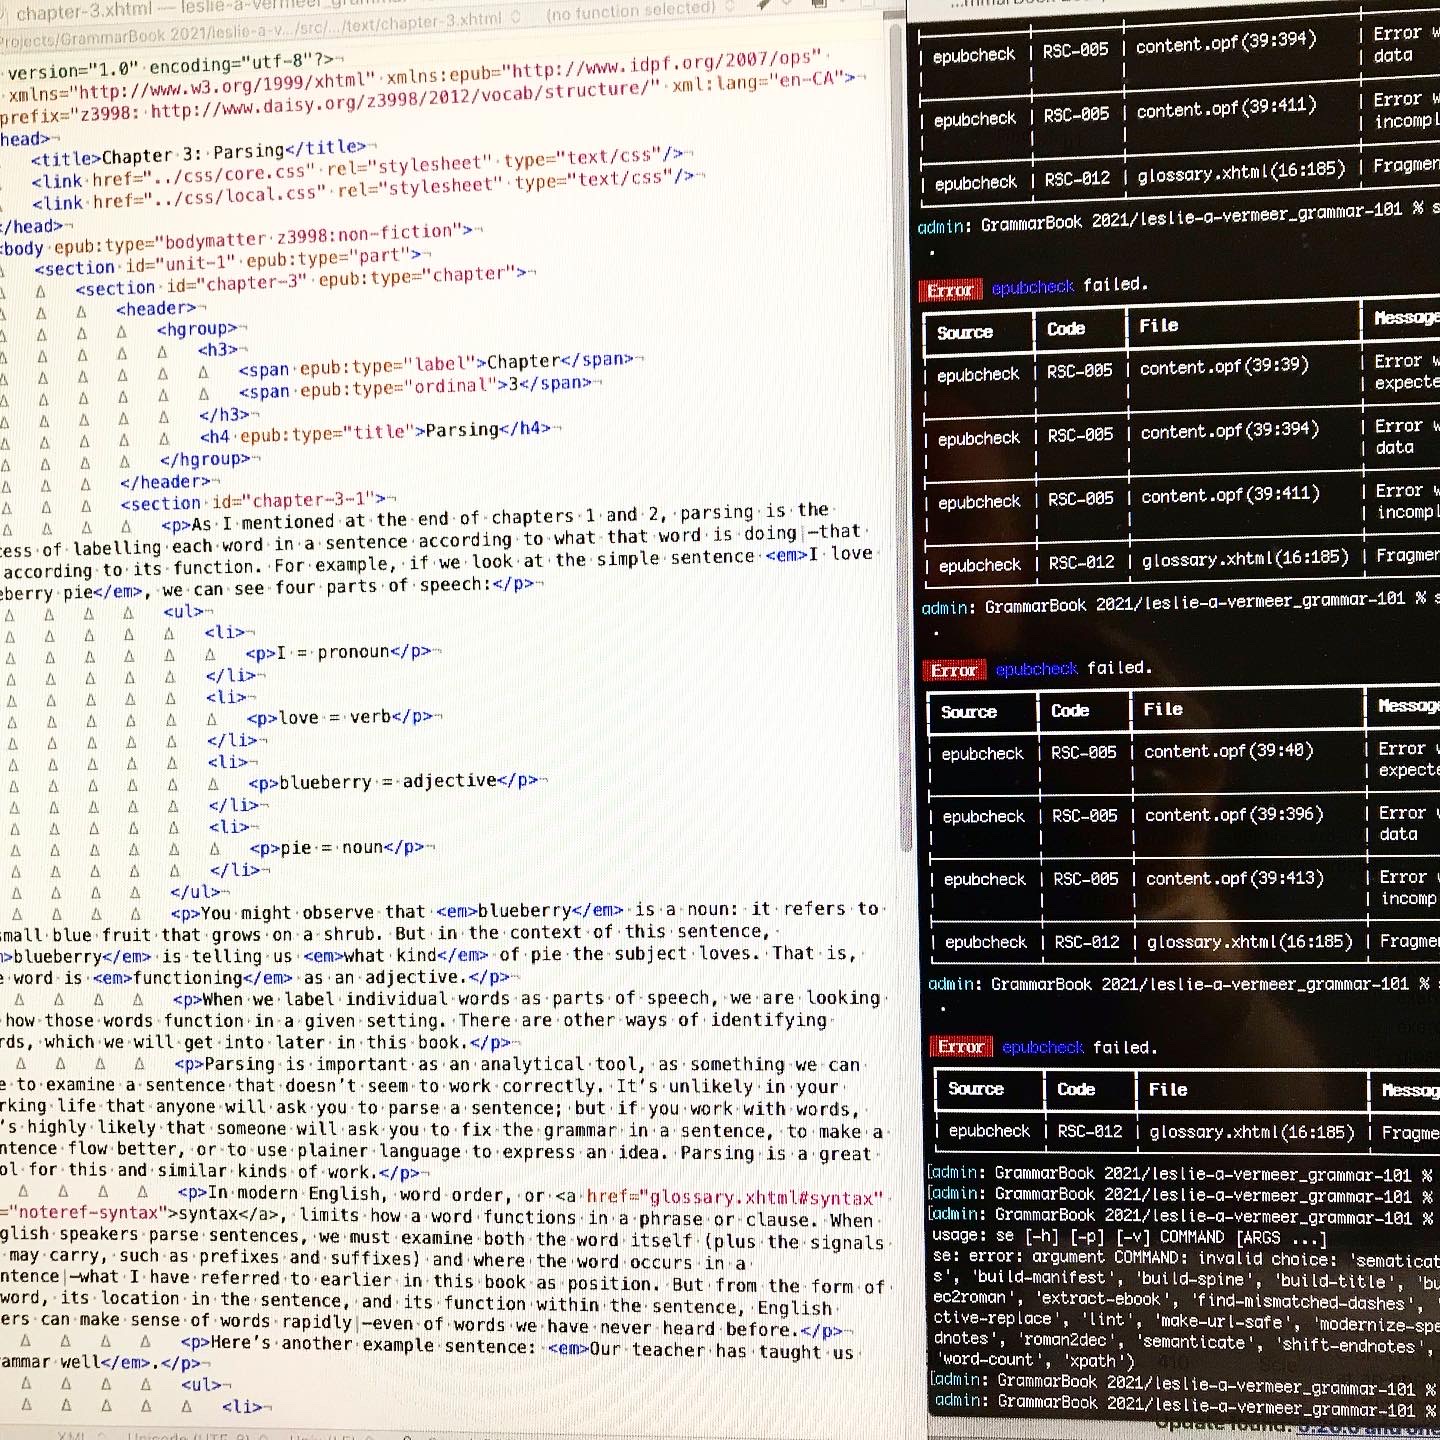
To get this:
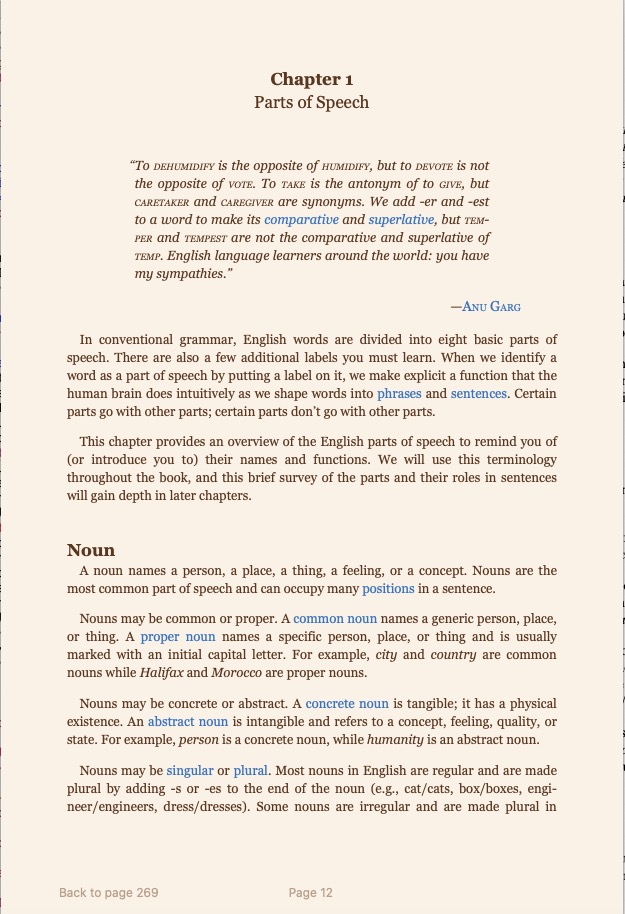
You need to produce this:
The single biggest issue I encountered (and this will be a surprise to absolutely no one who has had to do any kind of design) was…wait for it…Microsoft Word. Gawd, what a monstrosity. All I wanted to do was export files that had the appropriate heads, bulleted and numbered lists and text that was highlighted or underlined while retaining italics and bolds.. This is among the simplest and most basic html markup you can do. So you’d think that one of the many export to html functions. built into Word would be able to accomplish that, wouldn’t you?
Nope.
At worst I got massive amounts of unnecessary gobbledy-gook that still didn’t retain the list format and at best I got a cleaner file that apparently at random either retained the list format or translated the it into some complex css while turning the highlighted text into increasing more bizarre span links. But it wasn’t much of a surprise as there are tons and tons of Word -> html utilities out there and why would they exist unless to try and solve a problem that was pretty universal.
I looked at bunch of them but soon found that even that wasn’t going to work. Most of the rely n a copy form Word and past into an instance of tiny mce editor (a web utility to allow you to write and format text). After converting most of the files I discovered it had a weird glitch that dropped words in the last line of a list if it had any formatting applied. I didn’t look into exactly what the issue was but it occurred in all of the converters I could find.
Back to the drawing board.
In the end I exported all the Word files to .rtf files and then copied and pasted them into this converter. I was careful not to clean the html as that lost me some of my formatting. This left me with somethin like this:
<p class="p1">Chapter 1: Parts of Speech</p>
<p class="p2"> </p>
<p class="p1">In conventional grammar, English words are divided into eight basic parts of speech. There are also a few additional labels you must learn. When we identify a word as a part of speech by putting a label on it, we make explicit a function that the human brain does intuitively as we shape words into phrases and sentences. Certain parts go with other parts; certain parts don’t go with other parts.</p>
<p class="p1">This chapter provides an overview of the English parts of speech to remind you of (or introduce you to) their names and functions. We will use this terminology throughout the book, and this brief survey of the parts and their roles in sentences will gain depth in later chapters.</p>
<p class="p2"> </p>
<p class="p1"><h2> Noun</p>
<p class="p1">A noun names a person, a place, a thing, a feeling, or a concept. Nouns are the most common part of speech and can occupy many <span class="s2">positions </span>in a sentence.</p>

<p class="p1">Nouns may be common or proper. A <span class="s2">common noun</span> names a generic person, place, or thing. A <span class="s2">proper noun</span> names a specific person, place, or thing and is usually marked with an initial capital letter. For example, <em>city</em> and <em>country</em> are common nouns while <em>Halifax</em> and <em>Morocco</em> are proper nouns.</p>
Which was pretty easy to clean up.
Everything from then on went pretty smoothly. From raw text to a complete (albeit badly formatted) textbook was less than half and hour after I got the chapter templates set up.
The Fiddley Bits
- It needed a cover. I had a quick concept so that didn’t take long and the “client” was not fussy.
- It needed some internal links from word -> glossary and then glossary -> originating word and frankly this second bit took the most time of the whole project, as I didn’t know which chapter the word came from so I had to search each term and then edit the backlink. But it was only a couple of hours work.
- I had to do some research on Pressbooks to make sure I could convert the book later if I had to. I can.
- I also had to look at/for Library and Archives Canada’s list of Canadian Subject Headings (CSH) as I was used to the Library of Congress. Now there was a rabbit hole… or more accurately a morass. What a mess! I ended up just using BISAC codes.
- Figuring out how to convert to pdf. In the end I went with this online tool and then edited the resulting pdf in Acrobat to add page numbers and footers. It still had some bad page breaks but overall it made a pretty nice text.
- Custom css. I am still working on tweaking this. I want to keep it simple but still add a bit of functional design to make it easier on the eyes.
What’s Next
Well, L is going to pilot the 1.0 version this fall with her current class and in the mean time it will go out for peer review to various people. After any revisions and updates she hopes to add it to the OER network for others to also use as a teaching tool.
I will post up the links to the files when I get everything done and reviews are in.