Category: Linux
Pi update
…Because I know you care 🙂
 When last we left our intrepid Pi I had listed the software I had running on it. Here’s a quick recap of what that install was with a few of the missed out bits:
Pi 4 Model B with 8 gb of ram
5oo gb external
-
- Ubuntu 21.04
- Shairpoint-sync music server
- Nginx Proxy Manager
- Webhost Apache/php
- MySql server
- Pi-Hole
- Nextcloud server
- Samba File Server
But after watching a few videos (Novaspirit tech’s Pi series) and playing around with Docker a bunch more I basically redid the whole thing from scratch. So that makes the above info completely redundant 😉
SD backups
A word about installs and backups. One of the things I am especially happy about with the move to a Pi is the ability to image SD cards. It took me a while to get my methodology straightened out but here it is
Step 1: Install base operating system
I currently have two base installs:
- Ubuntu 21.04 — this is a GUI-less (command line only) install of the Ubuntu linux distro. It has become my main system.
- Ubuntu 20.04 Mate — this is the Ubuntu install with the MATE desktop and apps suite. I have pretty much abandoned this.
Set up server (this is for the headless Ubuntu):
- change host name
- add user
- set static IP
- install and set up Samba
- install and set up Docker & Docker Compose
Step 2: Create an image
After I had everything installed and set up, it’s time to make an image of the SD card. Shutdown the computer and and pop the SD card into the MacBook SD slot.
Open Terminal and use dd to make an image:
sudo dd bs=1m if=/dev/rdisk2 of=/Users/admin/Desktop/pi-server.img
To parse this, it is basically saying: using root permission (sudo), make an image (dd) using 1 megabyte blocks (bs=1m) of the disk labeled disk2 to a file on the desktop named pi-server.img
This can take a long time depending on the size of the disks. With a lot of trial and error I settled on using my 32 gb SD card to make these images from and it takes around 400 seconds (6.7 minutes). When I tried with both the 64 gb card or even worse the 500 gb hard drive the time sometimes was in the hours. Which was ridiculous because most of that copy time was copying blank space.
What this means is I have to make all my changes to the install on the 32 GB card, which may mean redoing them since I generally make them first on the hard drive install. But it works for me as it forces me to a) document the changes I am making and b) do them several times which helps me ingrain them in my memory.
This leaves me with 32gb disk image on my laptop that I then re-image back to the 500GB hard drive — which is a pretty quick process.
I repeat this process whenever I make a major change to my setup so I can revert back anytime I screw something up (which thankfully is happening less and less).
The new install
This time I started with the base install described above (Ubuntu, Samba for file sharing and Docker to host containers), made an image and then moved on.
Docker
As I said in my Drop Dropbox? post, Docker is is a sort of virtual containerizing system. Rather than a true virtual machine (which acts as a completely different physical machine complete with OS and hardware configs), a container is an isolated “box” into which you install your applications and whatever settings they need. The Docker host manages the network interfaces and whatever other i/o you need. The beauty of this is you can install all sorts of support programs or drivers without affecting — or in my case, screwing up — the rest of the system. If you don’t like it or make a mistake, you just shutdown the container and delete it and poof, it and all its resources are gone.
Portainer
 One of the things that made me switch to an almost completely Docker-based setup was the discovery of Portainer, which is a web-based GUI that allows you to manage all your Docker containers without having to understand the often complex and arcane Terminal commands used to invoke and manage them.
Oddly enough Portainer itself is a Docker container so that mean you have to do thing the hard way at least once. Create a docker volume (docker volume create portainer_data to store the app data on) and then run:
docker run -d -p 8000:8000 -p 9000:9000 --name=portainer --restart=always -v /var/run/docker.sock:/var/run/docker.sock -v portainer_data:/data portainer/portainer-ce
And you are done. Sign into the system by typing http://<insert IP address>:9000 and you should be good to go. Here’s a screen shot of all my containers at the moment:

NGINX Proxy Manager
Next up was a reinstall of NGINX Proxy Manager to manage SSL and routing. You can read about it in the NGINX Proxy Manager post.
One difference in this install was I used Portainer to install it as a Stack (a group of associated programs). This meant the NGNIX program and its associated Maria database were installed in separate containers that were linked together so they could be managed as a unit.
Then I reinstalled the Portainer container so it was using the same virtual network as NGINX and they now all talked to each other securely and happily.
Homer
An app called Home was recommended by several sources so I decided to give it a go. Home is a lightweight dashboard that allows one to have a convenient starting place for what is rapidly becoming my HomeLab. It runs off a simple yaml (stands for yet another markup language) text file.
You just add an entry like
- name: "Boat Search"
logo: "assets/tools/swan.png"
subtitle: "Utility to search Yachtworld"
tag: "pythonapp"
url: "192.168.1.3:8889"
target: "_blank"
And it adds another item to your dashboard.

Then I added a Samba entry to allow me to change the config.yml file and drop in additional icons
**MAKE ANOTHER IMAGE**
LAMP
With that done I installed my lamp stack again (Linux, Apache, Mysql, and php) to redo my test websites. I decided not to do this in a container as I figured it wasn’t going to change.
**MAKE ANOTHER IMAGE**
Shairport
Currently I am having issues with the dockerized version of this. The sound cuts out every once in a while and I can’t figure out why. I may go back to the direct install from What’s your Pi doing? and see if that solves the issue. But for now I have it as a Docker container—but disabled.
NextCloud
 (See Drop Dropbox?) Again this is now purely Docker based and the install was super easy using Stacks. I can turn it off and on as I like and see how much of my Pi’s resources it is using.
YouTube DL
 This one is new. I had this app installed on my Mac mini as it allowed me to download favourite YouTube videos for offline watching. But now I can use it with a web interface. I haven’t played with it much, but I expect it will be much more convenient than the command line version. (Note: I have subsequently had problems with this leading me to discover that YouTube is throttling the app. The first few videos go fine then it drops down to a snail’s pace rendering it almost unusable.)
**MAKE ANOTHER IMAGE**
Python Apps
I built a python/flask app to calculate Bus Fares for L and decided to see if I could dockerize it. It worked out pretty good and so I added it to the mix so L could use it. Again the ability to manage it and turn it off and on will be a bit of a godsend as I develop it further.

The apps needed python and a webserver (I tried to use nginx but ended up going back to gunicorn — I was having trouble with uwisg in the container). It took some fussing as the resulting containers were initially 800 mb but eventually I knocked them down to a sixteenth of that size.
I also decided since that worked so well I would take my boat search app (If you can’t boat, dream…) that was hosted on the Google Cloud and move it to the Pi. And in the end I was able to share the python container between the two apps.
**MAKE ANOTHER IMAGE**
Grafana & Prometheus
Last but not least I wanted to be able to track some data about usage and load since I was now adding quite a bit onto the poor ~$100 Pi. A bit of research, one last Stack, and I was good to go.
Prometheus is an application that collects data from your machine. It can organize and store a ton of stuff and is so complex I ended up just stealing others’ setups. It uses plugins (I installed cadvisor and node_exporter) to collect specific data. The two I have monitor the docker containers and things like the cpu/temperature/network stats from the Pi.
Grafana is a web interface the graphically displays a dashboard with whatever data you managed to collect with Prometheus. Also complex and the config is again “borrowed.”

Très cool.
**MAKE ANOTHER IMAGE**
So that’s it for now
Everything is humming along splendidly now. I still have the issue of Shairport to deal with but that is minor. I can go back to any of the multiple images I have and start over from there or simply delete a container and not have to worry about residual crud interfering with future installs.
I have tested docker containers for things like my Calibre library which I might potentially move off my Mac mini and am looking into OpenVPN and an online FileBrowser. But that’s all for the future.
I am a happy camper. But I wonder if I should get another Pi… hmmm…
What’s your Pi doing?
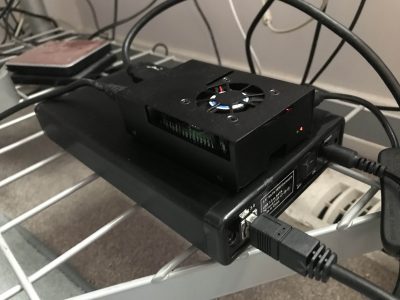
What am I doing with my Pi? Quite a few things actually. I installed the driver that lets it boot off an external USB drive and now it runs off the old 500gb drive from the old linux box—so there is plenty of room. Might as well use some of it.

Below is my current list (for posterity). One thing to note is it is all perfectly free and open-source—which I find beyond impressive.

Shairpoint-sync music server
This cool piece of software turns the Pi into an Airplay receiver. Since we run our household audio through Apple’s airplay system this means we can now also stream the household music to the Pi and have it output it.

L is 98% in charge of the daily music which means while she can listen to her tunes at her desk (with her desktop speakers) and through the house network (which currently has speakers in the kitchen, living room, tv room, upstairs bedroom and upstairs bathroom), I am usually listening to the audio from speakers located down the hall. By outputting the Pi’s audio into my desktop speakers I can now listen to the sound right here at my desk.
I had to write a small shell script to turn the audio off when I wanted to watch a youtube video or listen to my own music but so far its a pretty cool feature. Note: the Pi gets cranky with wanting to output the audio through its hdmi port and sometimes the solution is not seamless.
Nginx Proxy Manager
I have written about this and it is so cool to be able to route and reroute network traffic with a few clicks whenever I change something. So far it is forwarding 5 different domains to various computers and ports around the house.
Webhost Apache/php (2 sites)
The Pi currently runs 2 “test” websites that I use for development. This is what they currently look like but that changes whenever I have a new project.


A typical Apache/php install so nothing impressive but it gives me a lot of flexibility and is plenty fast enough for the minimum amount of user that will ever see it.
MySql server
This is really just an adjunct to the above install. Along with php, having a mysql database serve makes making dynamic websites easy. But I got into mysql because I could no longer run Filemaker on my computer anymore so I tend to treat it as a separate entity when I want to build database.
Pi-Hole
This one is still in development and I am the only one using it. Essentially what it does is route all the web traffic to my computers through the Pi and blocks all the ads.. I was already doing this on my desktop using the Brave Browser but now it should theoretically work on my phone, Apple TV, and all the rest of the computers while allowing people to use whatever browser they want.

It isn’t fully implemented yet mostly because I still restart the Pi a lot and it would take down the ability for people to use the internet whenever I did that. I can hear the screaming now!
Nextcloud server
I just posted about this. Again I’m not likely to implement this other than in a small way but it has so far been interesting to use. It auto posts any new images I take with my phone so I no longer have to sync it up manually and gives me a place to stuff files I want to share. And with the big hard drive theoretically I could store a lot of stuff there although that might mean speeding up the network etc to make it truly functional.
So we will see.
Samba File Server
The Pi is also set up as a file server using samba (which just means it’s compatible with apple, windows and linux). I have used it for temporarily moving files around but until I get some sort of RAID (Redundant Array of Independent Disks) and backup set up I am not likely to use it to store anything important.
Drop Dropbox?
Are we tired of computer posts yet? My Pi acquisition, along with a growing interest in linux and open source software has been taking up a lot of my time lately. And I need to write this stuff down, since that was one of the reasons why I started this blog, way, way back when… It’s sort of my backup memory for all things computer related. So you get to suffer.
Control my Data?
Speaking of why, having control of my own data has also been a big thing with me. Part of it was a lack of belief that the Googles or Apples of the world would last (and I’ve mostly been wrong about that) and that my images/blog/posts etc. would still be accessible a decade later… The blogspot blog I started back in 2002, is still going strong and L still posts to it sporadically. Still, I regularly download my Facebook info, repost all my tweets and instagrams to this site and have hosted this blog on servers I control since day one.


With the advent of cloud sharing controlling your own stuff became much more complex. I fell immediately in love with Dropbox. But I was initially (and still am to a certain degree) very cautious about what I put on their servers. It’s hard not to imagine some nameless drone rifling through my folders because he/she was bored. These days I am a bit more knowledgeable and this a bit more optimistic but still… the amount of leverage governments have over corporations should not be underestimated. (This is an interesting article about information sharing agreements between countries and highlights a few instances where they have pressured companies to not only spy on clients/customers but also not be allowed to disclose that they are doing so.)
Honestly, at the end of the day, I am not that paranoid, and don’t actually do much that any government agency would be interested in … but ya know…frankly, its none of their damn business… And I just don’t want anyone erasing or altering what is mine without me having my own copies. 😉
NextCloud
Anyway, back to Dropbox (and Google Drive—which makes me crazy although recently it’s gotten better—and iCloud and even Microsoft OneDrive to name the services I have access to). I’ve always wondered if I wouldn’t be better off using some sort of cloud/NAS (network-attached storage) of my own to store my stuff but it hass always turned out to be too much money for not enough security. (And basically that is still true, despite what the rest of this post implies.)
But a few days ago I discovered Nextcloud.
Apparently its just one of a bunch of self-hosted cloud solutions but it had good reviews so I decided to look into it. And wow. Just…wow. Totally open source and free; with desktop and mobile client apps and enough functionality that you could replace the whole google suite: mail, documents, sharing, calendars etc.
Download it, make some space on a hard drive, install it and forward a url to the computer and voila..your own personal dropbox service!
After a bunch of tinkering (I got stubborn and wanted to run it in a Docker container and that made my life much harder than it had to be) and it is now running happily on my Pi (and mac and iphone). I can now take a picture with my phone and have it synced to my desktop moments later. I also have a shared folder set up with L so anything I put in that folder appears in her setup as well (we use this function on Dropbox quite a lot to move files from her ecosystem to mine and back). I’ll be testing and playing with it for the next few weeks just see how well it runs.
The Pros and Cons List
Pros:
- pretty darn private and all on my own physical hard drives.
- unlimited space (at least until I fill up the drive)
- free
- easy to use and setup (at least the client part of it)
Cons:
- not quite as secure as it could be although I am using ssl and looking into encryption which is available
- not guaranteed 24/7 uptime since its on my server and Shaw’s network
- I would need a separate Pi, and a couple of new harddrives to mirror each other if I was actually going to use it instead of Dropbox…which takes it from free to ~$200–300
A word about Docker
Docker is a sort of virtual containerizing system. You can install whatever software you want to run in the “container” and it is separated from the rest of your machine. That way you can install things and be assured they won’t screw with the rest of your setup. The disadvantage is that being separate, it is harder to get things to talk to each other.
Since NextCloud needed to talk to outside my home network and vice versa, it needed to go through Nginx Proxy Manager which also ran in a Docker container. They didn’t really want to talk to each other as they were on “different” networks. After much fussing I had to take down my original Nginx container and make a new one that ran both Nginx and Nextcloud in the same container in order to get it to work. That means if/when I abandon NextCloud I will have to set up Nginx all over again.
Trials and Tribulations: the Pi edition
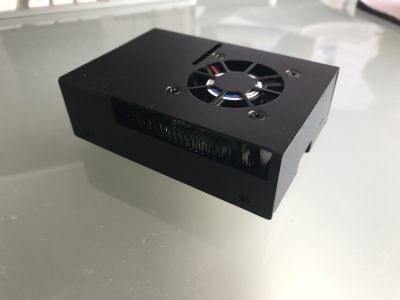
Making my Pi

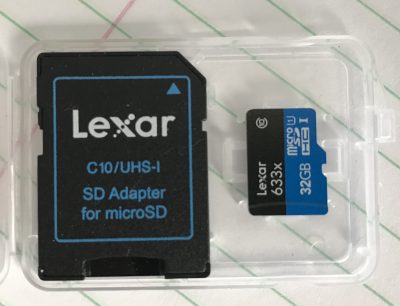
A Pi is just a tiny board in a box. At minimum you also need a power supply and a micro SD card to make it go. Better yet you should have a case, at least some heat sinks and maybe a fan. You will also need a HDMI -> mini HDMI cable if you plan on using a monitor and of course a usb keyboard and mouse. Above is everything I got in my kit (except the power supply which I forgot to include in the pic).
Assembly is pretty easy. Screw the board to the case; screw the fan to the lid; stick the heat sinks on using the self-adhesive pads; plug in the fan to the indicated pins and screw the case together. The only issue was a quick google said the 5v fan was a bit noisy and could be made a bit quieter by setting it up as a 3v fan. That meant figuring out which pins on the I/O board to use—which wasn’t much of a chore.
Flashing
Then you need to download an OS. I chose to go with Ubuntu MATE rather than the traditional Rasbian OS. Simply go to ubuntu-mate.org/download/arm64/ and download the iso file. At this point in time you can choose between 20.04.2 LTS or 20.10. What this means is the LTS (long term support) version is going to be supported at least until April 2023, so if you don’t want to be bothered with updating — you are good for a couple of years. The 20.10 version will need to be updated regularly to ensure everything is secure (actually when I did my download it stated it was only supported to July 2021).
Then you need the Pi Imager software which you can download for your working OS (I chose macOS) as I was working off my Macbook.
After that, insert your SD card in your computer (my Macbook has a regular SD card reader and I have adapters.)
Select the downloaded iso file, select the destination as the SD card and hit “write.” It will completely rewrite the disk so don’t leave anything you need on it. It takes ~5 minutes to write and verify a 32 gig disk.

When it’s done, pull out the micro SD, insert it into the slot on the Pi and power up the Pi (assuming you have already attached a keyboard, mouse and monitor via the micro HDMI port). For convenience you might also attach a network cable but it will ask to setup your wifi if not.
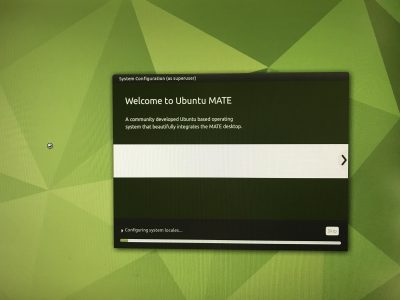
Boot
The boot screen will ask for your language preferences, user name and password, wifi setup if necessary and that’s pretty much it. You will presently have powerful little computer all ready to go, with pre-installed Libre Office, Firefox and more.
The thing that will take the most time is updating all the packages (software) once you are setup — something highly recommended. It might take up to 10 minutes or so to get everything current, especially if you opt to update to the new 21.04 release. And voila! C’est tout.
Advanced Setup and My Beefs
Of course that’s not really everything. I wanted to setup up a few extra things.
- VNC so I could remote into the Pi desktop without a keyboard or mouse,
- ssh so I could remote in via terminal,
- Barrier, a software KVM (keyboard/video/mouse) so I could share my keyboard between my Mac and the Pi without having to unplug it every time,
- Samba to share files,
- a web server,
- my NGINX Reverse Proxy,
- and backup images of my disk(s).
About half-way through I, as previously mentioned, decided to abandon MATE and go for a pure Ubuntu server install with no graphical desktop. I did get the first three items done on the MATE install so I went ahead and kept that SD card and started fresh on a new one.
One of the beauties of a linux system is I can have an infinite number of setups and just choose the appropriate SD card (or burn one from a stored image) and be up and running again in minutes no matter how badly I screw something up.
VNC and auto start
Three things made me abandon the MATE setup.
1) Ultimately I wasn’t going to need or use it,
2) Getting VNC to start on bootup was a pain and if I wanted to have this Pi in a different location I needed that,
3) Shaw’s modem was causing me conniption fits and I had to do a reinstall anyway. More on that later.
I tried two or three VNC clients and they all worked in some way, but I could get none of them to start up when the computer booted. Issues like this are the reason why an OS like linux is not for everyone. On Windows or OSX it either works or it doesn’t. On Linux, it should. Maybe. If you can figure out the right way to approach the problem. Using commands you have no hope of understanding. Cue swearing.
I ended up using tightvnc but never really got a reliable boot up going before I moved on to different problems.
A Shaw Rant
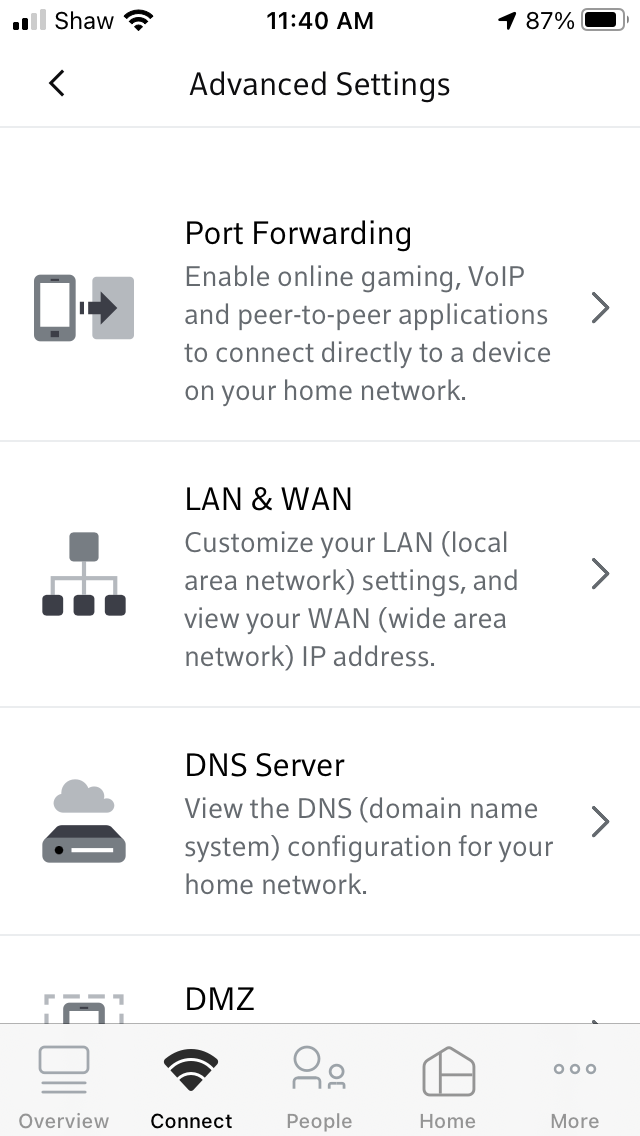
This is a bit out of order. I did install NGINX and get it running. But in order for it to work properly, I needed to forward the traffic from outside the modem to the IP of the Pi — which I had set at 192.168.1.4. Unfortunately when I first booted my Pi it had grabbed an arbitrary temporary IP of 192.168.150 which I new I was going to change. So later when I reassigned the Pi with the permanent .4 IP the $%^#& Shaw BlueCurve modem/router/wifi box refused to believe me. And since port forwarding was done not by IP, but by machine name, I needed it to reflect reality rather than its own personal prejudices. No matter how many times I set it up, rebooted things, renamed them and/or re-installed from scratch, it kept forwarding to the .150 address. Which. Didn’t. Work.

Eventually, after days of frustration, I waited until everyone had left the house and had to do a factory reset of the modem and then set it all back up again before it would forget that original “temporary” assignment. This time it grabbed the actual IP (which by this time was the Ubuntu server install with a different IP of 192.168.1.3) and I could forward traffic to the appropriate computer. Honest to god I have no idea why something so simple has to be so hard. This is the second time the asinine setup of the BlueCurve modem has caused me days of grief. Last time I broke the modem so bad they had to replace it. If I had the spare cash I would be tempted to just turn the Shaw modem into a plain modem and install my own router (like I used have using my old Apple router which sadly stopped working) so I could control my own network without having to resort to Shaw’s idiotic external website or an extra app to do something so basic (at least basic for a router, which after all is supposed to …well… route). But that of course comes with its own set of problems and probably would mean breaking it all over again.
Images
The last thing I wanted to touch on was disk images. After I got the Ubuntu MATE setup the way I wanted it and before I abandoned it, I popped the 32 gig SD card back in my Mac. After a lot of trial and error — and googling — I figure out if I used Terminal to run this command: sudo dd bs=1m if=/dev/rdisk2 of=/Users/admin/Desktop/piMATE.img then 379 seconds later ( around 6 and a half minutes) I would have a fully functional image of the disk on my desktop. At this point I could then use that image to burn the setup to another drive, including the 500gb harddrive I wanted to use instead of the SD card, or another SD card. It worked flawlessly. This the coolest part of the whole experiment.
dd speed
The dd command was a bit finicky. The first time I ran it I didn’t set the block size (bs=1m) and I didn’t use the rdisk command.
sudo if=/dev/disk2 of=/Users/admin/Desktop/pitest.img
As a result it took 8783 seconds (146+ minutes or 2.5 hours) to make the same 32gig image. As it is, when I did an image of the 500gig drive with the correct commands it still took 5461 seconds (1.5 hours). And I need to find drive with a spare 500gig to store the image on. My current project is to try and figure out how to shrink an image, as I know that the actual drive barely has 20gig of data on it —the rest is just blank space. Always something…
Ubuntu Server & Concluding…
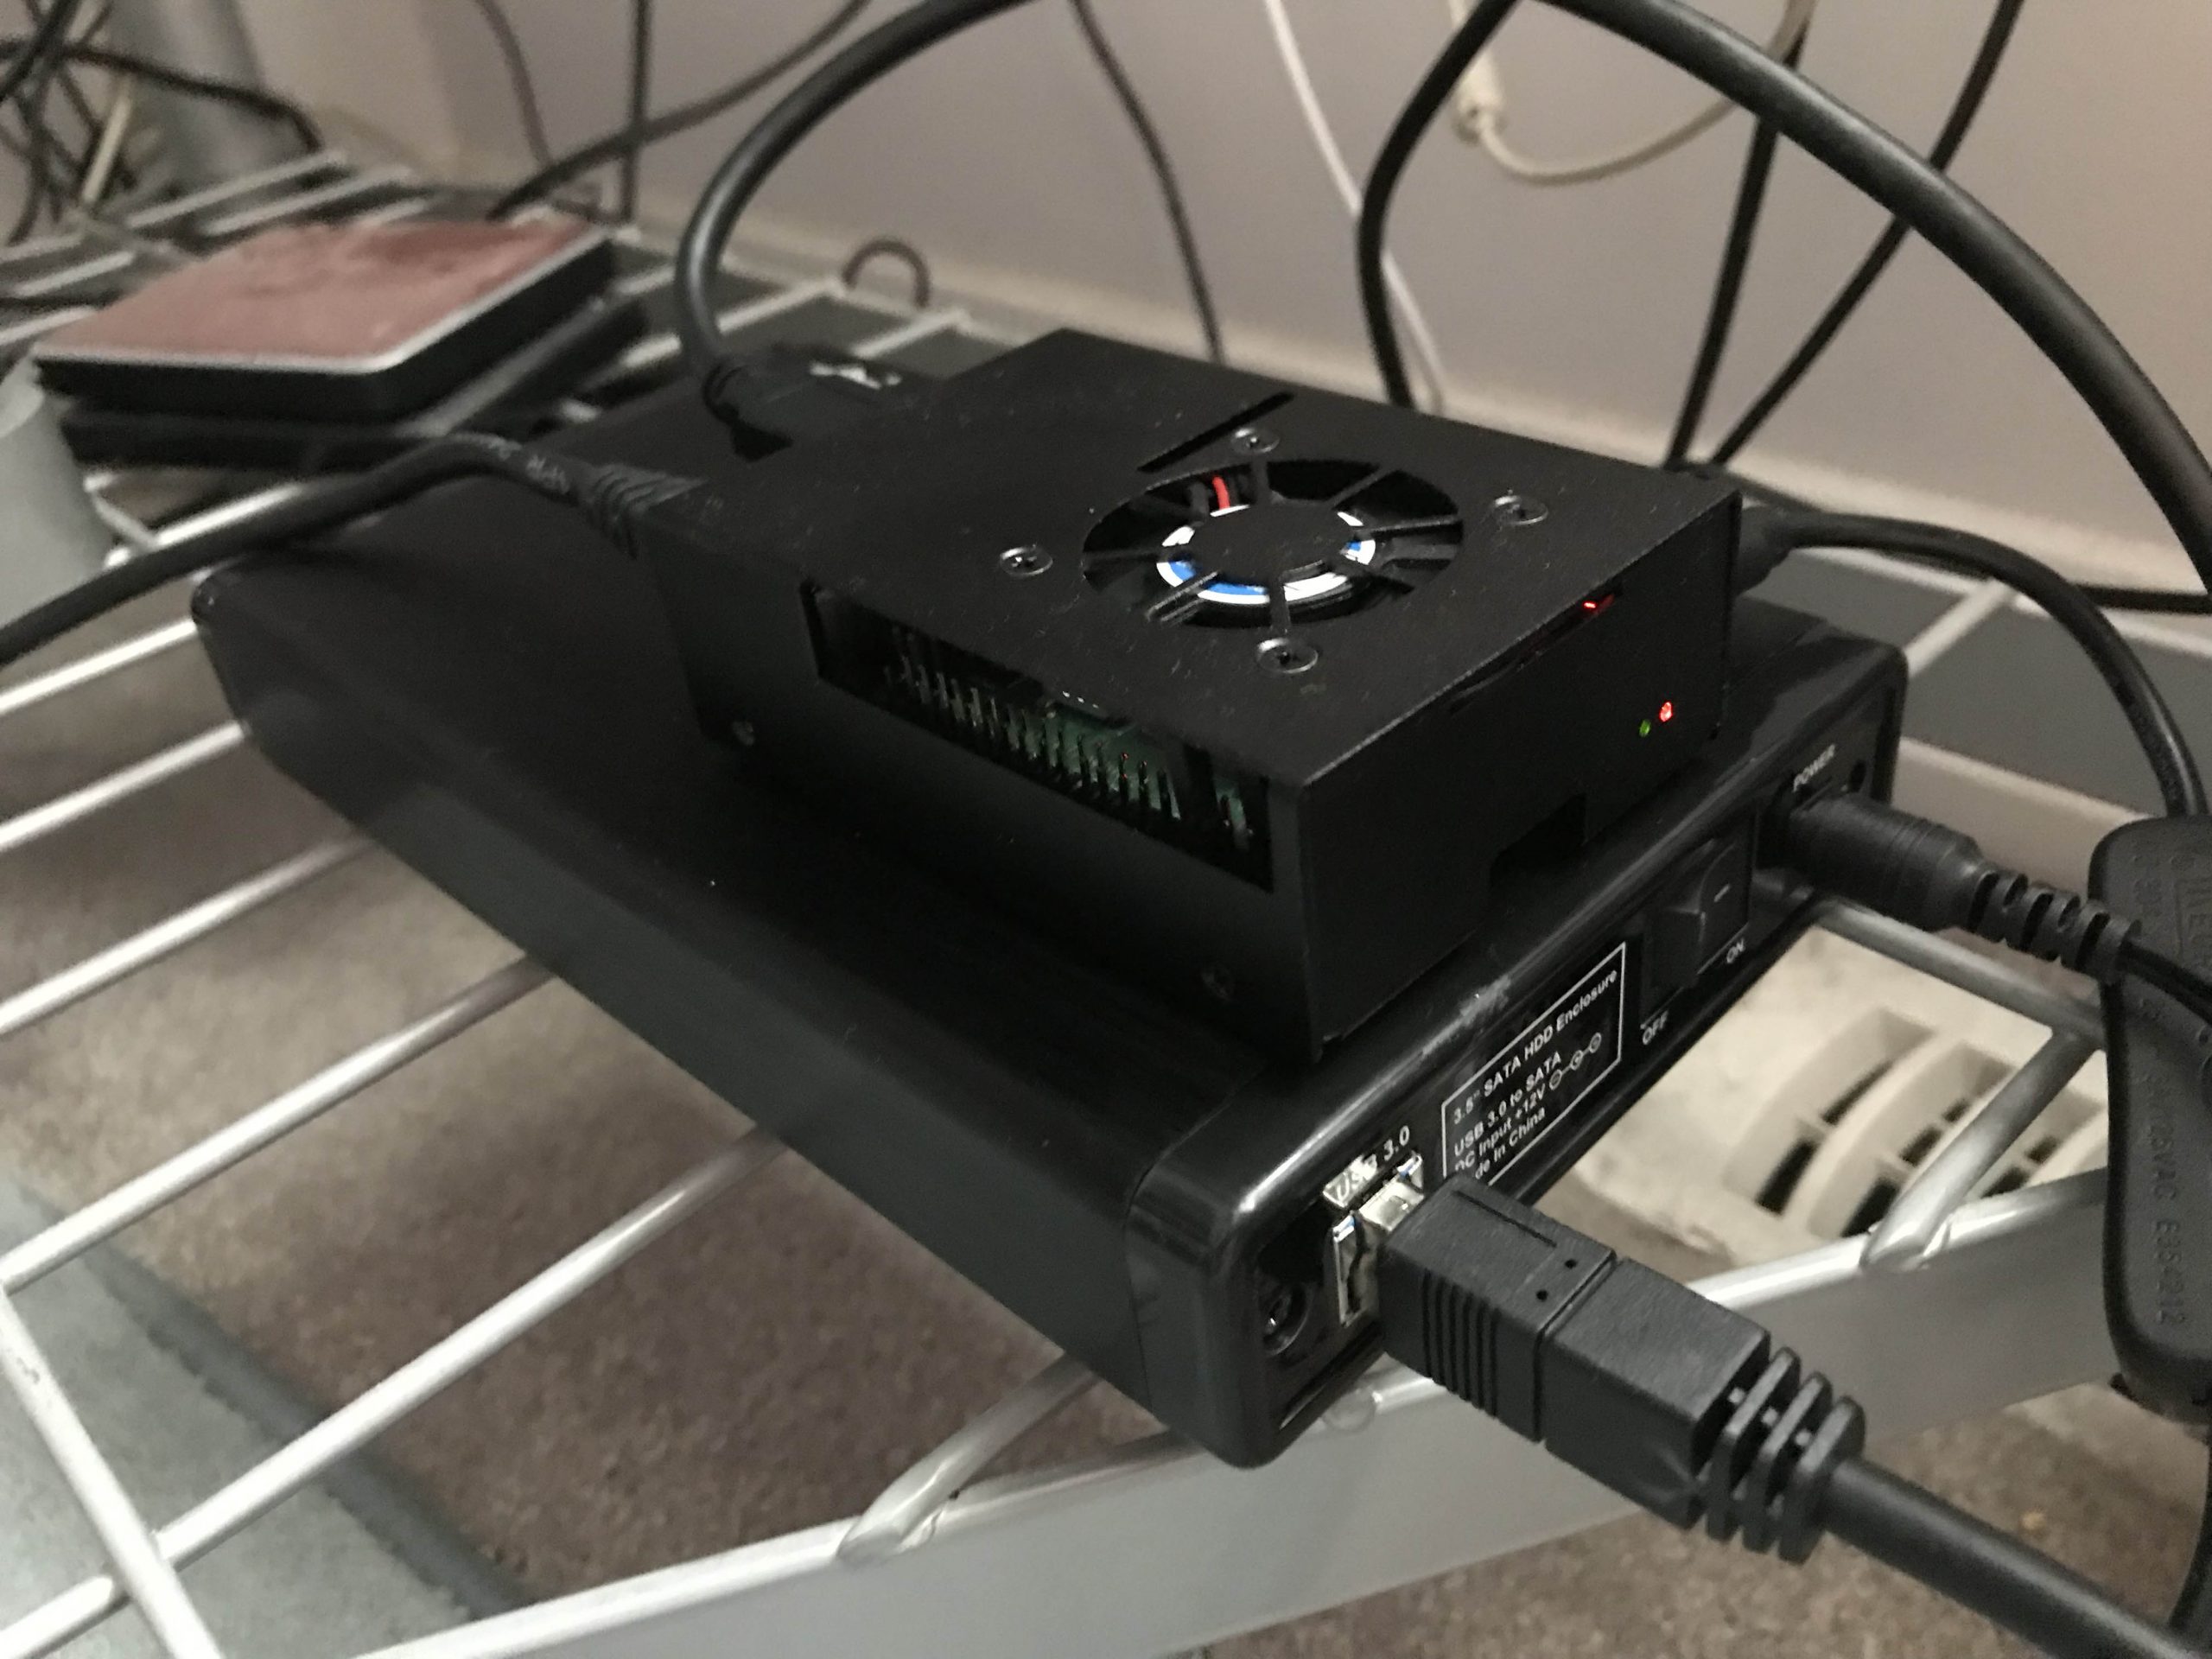
Below is my new toy with hard drive. As stated, I eventually installed Ubuntu server which has to be done completely by the command line interface, but by this time I was pretty comfortable with that. Everything else went pretty smoothly after so many fits and starts, and it now does everything I want it to including managing the internal web routes, serving two web development sites with php and mysql, and being used as an extra file server.
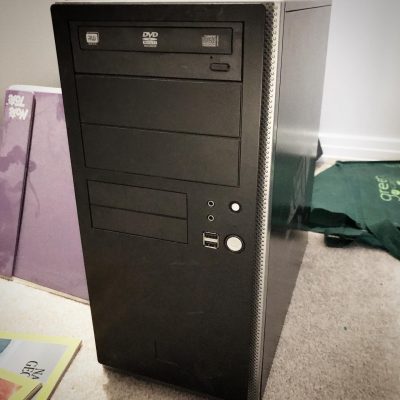
And, sadly, I delivered my old black PC to the computer recyclers. RIP old fellow.
Pi Day
I made Pi
A couple of power failures too many and my old PC which I had converted to a linux box was starting to wear. I had installed NGINX Proxy Manager on it and a) it was a bit slow and b) wasn’t coming back up after power failures. And since I had routed most of my internal web access through it it was… well… annoying.
What made it worse was after a power failure I had to haul the old black box upstairs, plug it into my monitor and keyboard and reboot it it to get past a bunch of warnings. Then haul it back downstairs and reboot it again. The last straw was the third time when the hard drive showed an error that I couldn’t fix from the prompt.
Talking myself into it.
I had been sniffing around Raspberry Pi’s for a bit now. For those who don’t know, Raspberry Pi’s are a single-board hobby computer that are dirt cheap. The latest iteration, the Pi 4b came with 8 gig of RAM which was 6 gig more than my old box had.
Specs
- 8 gig Ram
- USB 2 (2) and 3 (2)
- 2 HDMI ports
- gigabit ethernet
- Quad core ARM 64-bit processor @ 1.5GHz
- 2.4 GHz and 5.0 GHz IEEE 802.11ac wireless,
- Bluetooth 5.0
- Micro-SD card slot for operating system and data storage
The old Linux box, on the other hand, had 2 cores, 2 gig of ram, no HDMI, no wifi, no USB 3, 10mb ethernet, and no bluetooth. The only saving grace it had was it had payed for itself many times over.
Costs
A Pi though, was just a plain board; so in addition to the cost of the unit I would need some new cables, a case and a power supply. I found a combo deal for the extras and made a trip to Memory Express to pick it all up.
$112.99 Pi 4b 8gb ram
$24.99 Case/fan/power supply/heatsinks kit
and
$14.99 hdmi -> hdmi mini cable
$24.99 external case for my old 500gb drive
Total: $186.86 including tax
A steal! Of course I also need 16+ gig micro sd card (~$20) but thankfully I had a couple of 32s already. I also discovered I only had one usb keyboard (all my old PC keyboards were ps2) — so that was a pain having to swap back and forth. But after it was setup I wasn’t going to need one so I just toughed it out.
What OS?
I hemmed and hawed about what to install. Since this was a machine for learning and using linux I wanted as close to a vanilla experience as possible. In the end I settled on Ubuntu Mate as it was pretty close to what I had used on my old machine (Mint Mate). Most people go with a Raspbian OS install which is the default but it is Debian based and I wanted to stick with Ubuntu. ubuntu-mate.org/raspberry-pi/install/
I also wanted to be able to boot off an external USB drive so I had to “flash the eeprom” … essential write some permanent code to the chip so it would recognize the external drive as a bootable one. The only really scary part of the process but it worked just like the install instructions said it would.
Once again in English
Linux is an operating system. A distro (i.e. Ubuntu, Debian, Mint etc.) is a variety each of which may have made different choices in its history about which components to use to accomplish certain tasks. Sort of like a carburetor vs fuel injection on cars. A flavour (i.e. Mate, KDE, XFCE) is essentially just the desktop environment and apps; it may have different options installed and choose different base applications like word processors or web browsers. Think the SE model of your car vs. the LE model.
In most cases you can mix and match a lot of the options and customize your setup as much as you want because they are all based on the same core operating system.
In the end
To skip ahead, I did get a good install of Ubuntu Mate up and running — although once again getting the VNC client to run automatically chewed up hours. But in the end I changed my mind and went with a Ubuntu Server install which has no GUI or desktop (thus “wasting” all the time spent on getting the VNC to work). I figured it would be cleaner and I might as well learn to rely on the command line interface. ubuntu.com/tutorials/how-to-install-ubuntu-on-your-raspberry-pi I did keep the working install of Mate on my other sd card so I can go back to that when I have time and energy.
Also, for next time, I could have saved myself the $15 for the hdmi adapter cable as I have now figured out how to do the install remotely without using a monitor at all. Of course I needed the cable to see what it was I was doing as I learned how to do it without seeing it. So I guess I needed it after all. But next time…

Problems? What problems?
I have to say that the initial install went so very, very smoothly. I had a computer up and running in a couple of hours with zero issues. Of course, it wasn’t the computer I wanted and that’s where it started to go sideways. Most of it was operator error and I learned a lot (more on that in future posts) but one thing sticks out as a stupid error.
I had picked up the cheapest external case I could find to use the old 500gig drive on the Pi. The intention was to make it a boot drive and eschew the sd card entirely. But as I mentioned the drive was now showing errors and I had files I wanted to retrieve. I had intended to boot the old box from the drive after I moved it in to the case and drive and troubleshoot the drive using my Mac. But it was a USB 3 case with no backward compatibility. And the old black box only had USB 2 so it now couldn’t see the drive. Deja vu back to the original install Sigh.
No problem. I had borrowed one of my other external cases (from my backup drive) when I did the initial install way back when, so I could just swap cases. The problem arose when I broke something in the swap. The older case was not meant as a replacement unit and had tighter tolerances. By the time I had swapped drives for the 4th time it no longer powered up the drive…I must have bent something not meant to be bent. F*ck. So the new case went to my 2TB backup drive and back to my desk and I need to go get a new case.
At the end of the day (actually I think this was day 3) I decided I could forgo retrieving anything off the 500gb drive and, after I got a new case, I just reformatted the drive and started from scratch. Hopefully I didn’t forget to backup anything important but que sera, sera. I also realized much too late that of course I could have continued to run the Pi off the sd card and accessed the old drive in the original case I bought for whatever troubleshooting needed to be done. Sigh again.
My best moment in the whole process though, was when after I was up and running and happy with everything, I made an image of my sd card onto my Macbook. And then I plugged in the external, wrote the image to the disk, plugged it into the Pi and — omfg — the thing Just Worked.
In conclusion
So. I now have a fully functional computer about the size of a pack of cards that will do pretty much everything a light-weight computer user would want. The Pi’s have no graphics card per se so games are not really in the cards and they say it can struggle with high quality YouTube at times but that’s not really important for most people. On the other hand it can run two monitors right out of the box.
Linux has open source options for pretty much everything from an office suite to image editing that are compatible with most standards and can run most of the popular web browsers like Firefox and Chrome. So for <$200 (providing you have a monitor, mouse and keyboard) you can have a pretty damn fast computer that won’t be so different from a Windows machine or a Mac.
I have a lot more to say about the install but I think it will be a separate step-by-step-ish post. Suffice it to say after about 3 or four days of installing, googling and reinstalling I have a setup I like and can backup/restore easily. So it’s time to let the breaking commence!
NGINX Proxy Manager

What’s it all about?
My home server was just revolutionized! I’ve run several websites on my home network for years for testing purposes. Recently I was doing some work for hire and I needed to open them up to the wider internet. In the past I would just open up a bunch of port forwards and be happy.
Port forwarding: generally web traffic travels though various devices on a port 80 (http) or port 443 (https). You can open up other ports on your router and forward them to specific devices e.g. external traffic sent to http:macblaze.ca:8083 —> internal route 192.168.1.250:80
This results in opening a bunch of ports on your router (insecure) and having to give clients and others oddlooking urls like macblaze.ca:8083.
And recently Shaw has upgraded their routers to use a fancy fancy web interface that actually removes functionality in the name of making things easier. So my linux server, which had a virtual NIC (network interface card) with a separate IP, didn’t show up on their management site and I was unable to forward any external traffic to it.
But up until this week it was a c’est la vie sort of thing as I struggled to try and figure out how to get the virtual NIC to appear on the network. And then I saw this video about self hosting that talked about setting up a reverse proxy server.
NGINX Proxy Manager
Find it here: nginxproxymanager.com
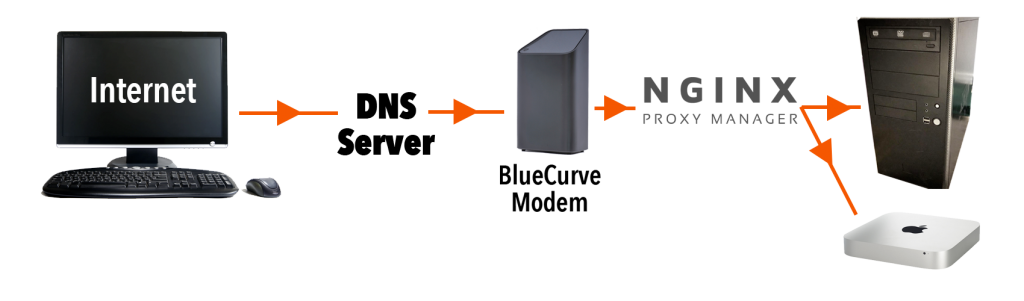
Turns out this was what I was supposed to be doing all along. A reverse proxy senses incoming traffic and routes it not via the port but by the dns name. So now that I have it set up I can just add a CNAME to my dns setup like testserver.myserver.com and it will send it to my home IP on the normal port 80. My router lets it through, passes it to the proxy server which then parses the name and then sends it on to the proper machine/service. So then whenever I set up a new project I can go and add testserver2.myserver.com and the proxy server will send it to where it belongs on my internal setup.
So cool.
My Set Up
I used to have some ports going to my Mac mini server and some ports to my Linux machine. Now all traffic is directed to the linux box. It runs NGINX Proxy Manager (NPM) on a Docker container and receives traffic on port 80. I moved the two websites hosted on that box to ports 8090 and NPM now sorts them based on the various CNAMEs I added to my hosting.
CNAMEs
CNAMEs are canonical names — akin to forwarding in a weird way. www.macblaze.ca is a CNAME for macblaze.ca. So if for some reason the IP address changes for macblaze.ca then www.macblaze.ca will still go to the right place. If I set up a domain myserver.com which points to the IP that is assigned to our house by our ISP (Shaw, Telus etc.) I can then set up the CNAME testserver.myserver.com which will be handled internally. If our IP ever changes (which it used to do quite often) now I only have to change the one record and all the CNAMES will still work.
Docker
Docker is a virtualized container system. I haven’t a lot of experience with it but this iteration of the NGINX proxy is a GUI based implementation of the command line version and the developer decided to set it up as container (sort of a mini virtual computer) so he could easily roll out updates as necessary. So my poor old Linux box is now running virtualized software on top of being a web server and a linux sandbox. Not bad for something from 2009. I will start playing a bit more with docker because it allows you to build a container and implement it with all sorts of things without affecting the main machine and, best of all, be able to throw out any changes and start again. we will see if the old PC is up to it or not.
I also installed docker-compose in order for Docker to run “headless” in the background.
Here’s a good video on the process:
The Process
Docker
(From the video)
Update the Linux system:
– sudo apt update
– sudo apt upgrade
– sudo apt install docker.io
Start
– sudo systemctl start docker
– sudo systemctl enable docker
– sudo systemctl status docker
Check to see if its working by checking the version: docker -v
Then test by installing a test container:
– sudo docker run hello-world
Docker-Compose
sudo apt install docker-compose
To verify: docker-compose version
Then check permissions:
– docker container ls
If you are denied:
– sudo groupadd docker
– sudo gpasswd -a ${USER} docker
– su - $USER
NGINX Reverse Proxy
Make a directory (make sure you have permissions on it)
sudo mkdir nginx_proxy_manager
I had to change permissions. Then create a file in the directory:
nano docker-compose.yaml
Copy the setup text from https://nginxproxymanager.com/guide/#quick-setup and change passwords
- Be sure to change the passwords
Then compose:
– docker-compose up -d
This grabs the specified docker containers, sets up the program and database and creates the virtual machine that is running the NGINX Reverse Proxy server.
You should be able to access the GUI at [http://127.0.0.1:81]
Set up
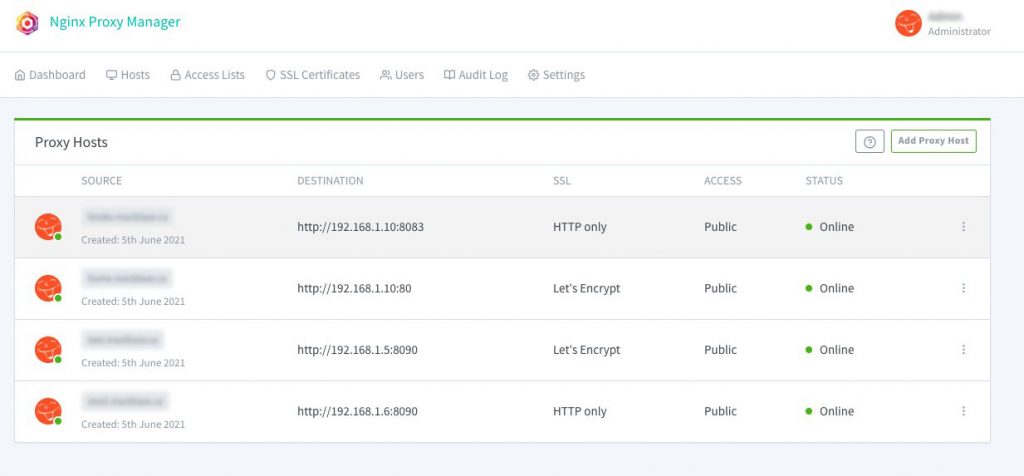
At this point it is a simple matter of adding a proxy host. Be sure to take advantage of the free SSL offered through Let’s Encrypt ( a non profit Certificate Authority).
- click add proxy host
- Add domain name (the CNAME), IP to forward it to and the port
- Go to SSL tab
- Select “Request a New Certificate” from the dropdown
- Select Force SSL (this will auto forward all http requests to https), agree tot eh terms and add a contact email
You should be good to go. Go ahead and add as many proxies as you have CNAMEs and servers.
Remember
And remember to close down all the ports on your router if you’d been like me and opened a bunch. Now you should only need 80 (http) and 443 (https).
Like I said—it’s been life changing for organizing my environment.
My new Linux install
The hardware
I have had a PC/Windows box sitting by my desk for decades. The latest I bought in 2009. I’ve been a Mac guy since I started in graphic design but never really let go of the Windows system. I played games on PC and used it for the occasional foray into the Windows ecosystem if I needed to use something that wasn’t yet cross-platform. It was setup to use Synergy (a software based KVM) to share my keyboard and mouse and I just flipped the secondary monitor from hdmi to DVI whenever I wanted to use it.
In 2015 it was happily running dual-boot Windows 7 and 8—then I turned it off and left for our sabbatical on the coast. And I never really turned it back on again (aside from one time to retrieve some files)—seems a year of just working (and playing) on my MacBook had finally converted me. And there was Windows 10 to contend with and I wasn’t a fan of the new desktop. Two years later I chanced to fire it up and it just beeped angrily at me and shut down. I was too lazy to track down the issue, so I moved on. Two more years later (about a month ago) I decided to rescue the poor thing and maybe try to set it up as a linux box.

Stats
- AMD 2.8 Ghz 7850 Dual core (2009)
- M3A78-CM Asus motherboard
- 2 GB RAM
- 500 GB sata harddrive
Oh yah, the angry beeps
When I decided to try and resuscitate the poor old thing I took the sides of the case off and saw the processor’s heat sink and fan dangling from its wires. Somewhere along the way the plastic clips that held the heat sink to the processor had come off (broken actually). As soon as I re-secured it, the PC fired right up and booted into Windows. But I was committed to the Linux experiment so I forged on.
Attempt #1
I downloaded the Linux Mint: Cinnamon iso and a utility to flash it to a usb drive on my Mac and proceeded to follow the instructions. My knowledge of boot partitions is shaky since I hadn’t done any playing with installing harddrives since the early 2000s — so I just did what the internet told me to do. Silly me, I know.

Step two was to boot the PC from the flash drive. The theory was I just went into the BIOS, selected the external USB as the primary boot drive and Bob would be my uncle. Unfortunately for me, I was stuck with Uncle Snafu. My BIOS was very old and it took a significant amount of experimentation to even get the USB drives to show up. But I did it and hit restart.
The BIOS splash screen came up. And that’s where the whole thing stopped.
After a bunch more tries, a search on the internet for an updated BIOS (2010) and some scary moments trying to flash the new BIOS. I tried again. And again. And again — this time walking away from the stuck screen for a couple of hours to see if it was just (glacially) slow. Nope. Nope. Nope. It was not going to boot from a USB drive no matter what I did.
I tweaked settings, re-downloaded files, switched USB ports and sticks, tried different hardware configs and did a lot of googling.
After about 2 days of this frustration, I gave in, pulled the harddrive for re-use, mournfully posted a picture of the poor thing on Instagram for posterity and moved the defunct box to the head of the stairs to be sent out for recycling.

And there it sat.
A Glutton for punishment
aka “Attempt #2”
I couldn’t take the failure. I wanted to play with linux and the virtual machine on my mac mini server just wasn’t cutting it. A search online for a Raspberry Pi’s or other such NUCs kept coming back to a ~$200 investment for what was ostensibly just a toy. And there sat that black box, with a perfectly good cpu and harddrive…just mocking me. Stupid motherboard and its decrepit, old BIOS. I tried re-pricing a new motherboard but it quickly became one of those moneypits where you needed to upgrade pretty much everything in turn and the $$ count kept rising.
So I decided to try again. Just once more. Because I really, really hate it when a computer wins.
I hauled it back to my desk, plugged it all in, inserted the USB stick and hit the power button. It booted. I mean it booted all the way to the Linux install menu and then right into the Linux system itself. What the everloving f___? A bunch of head scratching, playing around and experimenting and a lot of muttering later and I figured it out. There was no internal harddrive anymore. Something in the BIOS must have not liked the USB competing with the internal sata system and just hung there. Success? Well even though I had successfully booted the installer, without a harddrive to install it to, I was still stuck.
Or was I?
The games afoot!

Ok. Sata: bad. USB: good. And I had an external USB drive that I used for time machine backups on the mac. Odds were it was just a sata drive in a USB case. I took it apart and yup, just a sata case. Now we were cooking with gas. I swapped out my 2 TB back-up for the 500 GB windows drive and plugged it into the PC. I had to go back into the BIOS a bunch of times to make sure it was going to boot off the USB stick but after that, it all fired up smoothly and I could see the “external” 500 GB drive right there on the desktop. I WIN! Take that computer!
Merrily I followed the instructions and ran the installer. And then I hit a weensie bit of a hiccup. Remember the Windows 7 and 8 installs? Those partitions were right there along with a smaller boot partition. The Mint installer was giving me choice of which partition I wanted to install to. All I had to do was select one. I say this all pretty confidently now but at the time I was mucho confused and my fumbling around pretty much ended up making all the various partitions unusable by the time I was done f@cking around. Tony* would be so proud.

Fast forward at least a day of screwing around that involved grub errors and something called an “invalid arch independent ELF magic error.” Gotta love Linux programmers.
I finally got the drive cleaned off. I stripped it back to the bare bones and got it repartitioned properly with a working boot sector and then did a clean install of Linux Mint and lo and behold: it worked. I had a fresh install of Linux working and connected to the internet and my network.

Remotely interesting,
but too schtupid to be true
The purpose of this refurbished beauty was to sit somewhere out of the way and let me flail away on it. To that end I didn’t want to waste a keyboard/mouse/monitor on it. So I needed to remote in. I got SSH working fine so I could remote in via terminal (i.e. command line stuff like old school DOS commands but unix/linux ones instead) but ran into some snags when setting up VNC (Virtual Network Computing — a way to remote access and control a computer from another computer).
Long story short: x11vnc, which is the recommended vnc server for Linux Mint Cinnamon, which was a recommended install of Linux for beginners had a few issues with headless operation (i.e. no monitor attached). For one, it worked perfectly fine when you booted the computer with a monitor attached but introduced a 3 second delay to every mouse movement or click when you booted it without. As you can imagine this took me a while to discover as all my preliminary setup work was done with a monitor attached. On the other hand, all the other vnc servers I tried didn’t seem to play very nice with Cinnamon. Welcome to the freedom and tyranny of choice — there is a reason most people stick to Mac or Windows OS’s. The issue, after a lot of online searches turned out to be screen compositing (whatever the hell that was) and was a known bug…if I had known to look for it. Unfortunately Cinnamon has compositing baked in and you can’t turn it off like most of the “helpful” websites suggested.
Eventually I came to the conclusion that Cinnamon and I weren’t going to work out. Tragic really. So I tried Xfce, which was a lightweight desktop environment for Mint. Blech. Way too lightweight. Then came MATE, which is a fork of Gnome2, which was a variation of Gnome, which was one of the original linux desktop environments. And it came with a handy switch to turn off compositing. And just like Goldilocks, I found it just right.
In conclusion
I have my old PC up and running. It has three desktop environments to choose from, but I boot straight into MATE. I can access it via terminal or Mac’s built in screensharing. It has been running for 3 days now and hasn’t crashed, locked me out, or reset its compositing (which it was doing for a while after I installed MATE). I have now installed a ton of stuff (see below) and it is humming along (I forgot how loud the fans were) beside me connected only by an ethernet cable.
Ta-da!
I am pretty stoked. I can now move the box downstairs and offload some of my background processes to it and never really worry if I manage to screw it up because it really is a testing server. And Linux has some cool ways to “capture” a system image that you can revert to if you get to cute typing in commands you have idea what their purpose is — which I often do.

VNC and terminal, side-by-side, both looking remotely at the linux box.
Stay tuned.
Software to date
- ssh: to allow secure remote terminal access
- LAMP (Linux, Apache, MySql, PHP):
- Apache is the the webserver
- Mysql the database software
- php is the language to allow webpages to talk to the mysql databases
- Samba: to allow the linux box to share files with Windows and Mac computers
- VSCode: for programming and file editing
- Midori: a lightweight web browser in lieu of Firefox or Chrome
- Mate Tweak: to adjust a few additional settings
- Handbrake: for ripping dvds. I tried a couple and while it works it is very slow so I won;’t like use it for that purpose.
There are tons more things I could add like GIMP and Inkscape, but I don’t intend to use it as a workstation and it is a bit slow for any heavy duty lifting. Mint also has a lot of stuff preinstalled like a firewall, python3, video codecs, Firefox, VLC, ImageMagick, Libre Office and a ton of handy utilities —most of which I won’t use but are nice to have.
* Anthony (Tony) was our IT support person from Avante Garde Technologies back in the day and he made a tidy profit coming in and fixing the things I managed to screw up under the guise of trying to save money and time. Great guy.